Taking care of bees is not limited to country folk. With recent advancements we have in the field, becoming an urban beekeeper has become more realistic than ever. By keeping bees, you can help to preserve the species and make sweet honey for our personal use.
Table of Contents
In this article, you will learn about:
- Urban beekeeping
- The laws that protect you and the community
- How to get your hive started
- The equipment you need
- How much it is going to cost you
- Finally, how to harvest honey
Urban beekeeping is not a new concept, I’ve found accounts of people keeping bees in cities dating back to the 1950s. The practice has continued to grow over time and due to a more tolerant community and advancements in the industry, the novice beekeeper is able to take care of their hives even better than ever. If you are keen on learning more about how to start your hive in your suburban backyard or apartment rooftop, keep on reading.
The Difference Between Urban and Rural Beekeeping
The whole division between urban and rural are based on development. When we talk about urban settings, we pertain to a specific area that is densely populated and is surrounded by man-made infrastructure. Urbanity is often isolated from nature, and the residents do not really engage in agricultural work. They are more focused on commerce and trade. Whereas rural areas are located beyond the outskirts of cities, with low population density areas where agriculture is the primary source of income.
In beekeeping, taking care of bees in a rural area is commonly practiced. There is an abundance of space and definitely more plants for the bees to gather food from. It is the more ideal setting, but with the latest trend of urban beekeeping and increasing numbers of greens spaces in urban settings we are seeing more people in cities and suburban homes start their own hives.
According to a study conducted by the National Union of French Apiculture (UNAF), bees in urban settings are more productive and healthier compared to their rural counterparts since they enjoy the higher temperatures, have a wider variety of plant life, and avoid effects of pesticides which are commonly used to control pests from farming crops.
Beekeeping in urban areas may potentially cause anxiety for neighbors, but in order to get rid of that stigma, education and communication is the key.
State Law on Urban Beekeeping

Is keeping bees in your home legal? Generally, the answer would be yes since most communities are quite tolerant of bees.
With the recent popularity of the hobby, there have been ordinances or laws that restrict the number of hives you can keep and in more extreme cases, prohibiting them entirely. Some states would even require that their in-house apiary inspector monitor your colonies over a period of time. Nowadays, most states would require you to acquire an Apiary License in order to actually keep bees at your home.
- Your state’s department of agriculture website would be able to provide you with enough information regarding the state’s bylaws on beekeeping. As we have mentioned, licenses are commonly required in most states, but others are not as strict. When you log onto the website, all you need to do is download the forms you need for licensing or an apiary inspection.
- After local authorities have approved your space, all you need to do is follow the specific requirements or other suggested details set by the apiary inspector and you’re pretty much done with the process.
- Fees will depend on how many colonies you plan to keep. After passing your apiary, the officer in charge will provide you with the total required fee, and all you need to do is settle the payment.
Bees are not pets you can completely tame. They are semi-domesticated at the most, which would definitely be one of the main concerns as to why laws are in place. If you live in a densely populated community, you can be sure that there would be more restrictions in keeping a hive since the chances of someone getting injured because of your bees would definitely be greater.
Here are some points you may want to consider to avoid any unforeseen issues:
- Choose the Right Place For Your Hives
Bees are quite territorial, which is why they would attack people who do go too near their hive. This is regardless if those individuals have any intention of causing harm to the hive. It’s just the way the bees are wired. Choose a spot away from foot traffic, you wouldn’t want passersby getting stung out of nowhere.
- Protect Your Guests
If you do have any guests or workers that would be anywhere near your bees, you must give them a fair warning and exert an effort to protect them should they be near the hive. Having been invited onto your property means you are liable for any harm that may come upon them, and you wouldn’t want to be accountable for any mishaps involving your bees.
- Keep a Reasonable Amount of Bees
If you live in a cramped area where there is not enough space, it would be best to keep just one hive. The more bees in the area mean the more liability.
In retrospect, the law on beekeeping would be different from one state to another and it would be best to contact the department of agriculture of your state, or even the local bee association in your community to know further details of this.
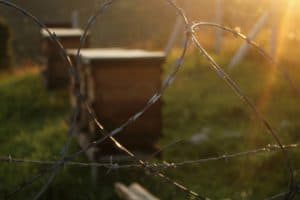
Appropriate Places to Put Your Hive
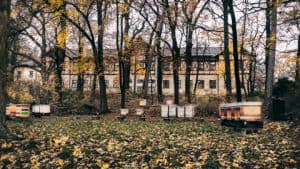
By the time you have everything figured out, it’s time to set the perfect place for your hive. In deciding, you must keep in mind that urban hives have the same needs of rural hives. All bees need morning sun, afternoon shade, a water source, and warmth during the winter.
Deciding where to place them may be a bit tricky since you would want them to be in an optimal position, yet at a safe distance from other people. Before investing and building your hive, the first thing you should do is figure out the logistics.
Here are some options you can choose:
- Community Garden
If you don’t really have space, check in with your local community garden. There is bound to be a space for your hive. Just be sure to make it safe for visitors and gardeners.
- Roof Deck
If you are living in an apartment, the roof would be a great idea. Open space, far from foot traffic, and all the privacy you may need. Just be sure to clear it up with your landlord first.
Ideally, anywhere the bees are able to acquire their basic needs would be a great spot for them. You just need to be certain that you are not breaking any laws by placing them in a particular place.
Seeking Out Beekeeping Communities in Your Area
If you are fairly new to the hobby and would want more real-life experience in the matter, getting in touch with a local Beekeeper’s Club will definitely help out in your venture. You will learn a great amount from the veteran beekeepers and eventually be able to help other newbies in the scene.
Thanks to the internet, you are literally a few clicks away from finding your own little colony within your community. Just type the name of your town or city, and search for “beekeeping clubs” or “beekeeping associations”, there are bounds to be dozens of options for you to choose from.
If you do live in a small city, with not too many people interested in beekeeping, one thing you can do is join online forums and be part of the online community with hundreds and thousands of beekeeping hobbyists.
Basic Equipment and Their Cost
Setting up for a colony doesn’t come cheap, in fact, it is quite an expensive hobby. You would potentially be spending $300 to $500 on equipment, tools, and other necessities. If you plan on building your own hive from scratch, it may come cheaper, but you will still need to break the bank for a colony with a queen. The good thing about this hobby is that it is cost-effective. Spend now, and earn back your capital by selling jars of sweet honey.
What you need for starting your hive
This list considers the most common tried and tested Langstroth Hive.
- Hive Box ($120 to $300)
The price of your hive box would be dependent on the type of hive you choose and the materials used. It’s natural to want a very high quality finish in an urban setting as it may encourage your neighbors to be more accepting of it.
- Hive Stand
These stands hold up your entire hive and are quite important in elevating your hive to improve air circulation and minimize moisture.
- Bottom Board
Like the hive stand, it supports most of the hive. It comes in two types: solid and screen. Solid bottoms are great for keeping your bees warm and deters fire ants. Whereas screen boards are helpful with mites. When bees clean themselves, the mites fall through the hive instead accumulating on the bottom.
- Slated Rack (Optional)
This layer basically regulates temperature. It keeps bees cool during summer and warm during winter.
- Entrance Reducer (Optional)
Fits perfectly in the entrance of your hive, this piece limits bees access to the hive and keeps the bees warm during winter. Most of the time, it is used to prevent invasion from other insects. The limited space makes it easier for the bees to protect the hive.
- Deep Hive Body
This is mainly used to house the bees and hold the frames where the honeycombs will be built on. It can hold approximately 8 to 10 frames depending on how big your hive body is. Ideally, you would want two of these. The lower body will be used as the brood chamber, while the upper body will be the food chamber.
- Frames
Each frame is affixed with a beeswax foundation for the bees to build their combs on. They are usually made to fit the type of hive body you have. There are plastic frames available in the market, but wood ones are definitely better to use.
- Shallow or Medium Chamber
This is the chamber where your consumable or surplus honey is collected. It comes in two sizes depending on your need and is advisable to place only during the honey season.
- Queen Excluder (Optional)
Placed in between the two deep bodies of your hives, this piece basically prevents your queen from laying her eggs in the food chamber since she won’t be big enough to fit through. There has been quite a debate on its usage, some veterans say that it just irritates the bees and lead to an unproductive hive.
- Inner Cover
The purpose of the inner cover is to provide good air circulation and spacing from the top of the hive. It is available in both wood and plastic. If you have a top feeder installed, you would not need to use an inner cover.
- Outer Cover
When choosing an outer cover, it would be best to get a long-lasting material like cedarwood or cypress. If not, plastic outer covers would work great since they do not rot at all, practical, but not especially pretty to look at.
If you do decide to build the actual box on your own, you would be glad to know that these parts can be purchased separately.
- Feeders ($5 to $15)
Hive feeders are especially helpful during cooler seasons. During those times, bees are unable to collect nectar due to the weather and lack of flowers to go to. Instead of starving to death, you can actually install feeders that can provide them with the food they need during winter. Most beekeepers opt to use a fondant block, while others prefer good old sugar water instead. There are quite a lot of types available in the market:
-
- Top Feeder
- Entrance Feeder
- Pail Feeder
- DIY Bag Feeder
- Frame Feeder
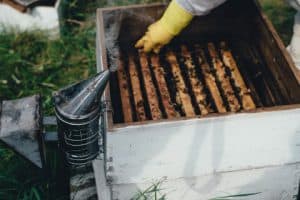
- Smokers ($15 to $35)
The smoker is definitely going be one of your most handy tools. Using smoke on your hive changes the behavior of your bees entirely, making it easy for you to inspect your hive and harvest your honey. - Hive Tool and Frame Lifter ($5 to $15)
This hardware is definitely handy in inspections and harvesting. You can easily scrape off the wax from the woodware, and it helps loosen the frames that may be fused together due to the comb.
- Bee-Proof Suit and Accessories ($30 to $150)
Until your bees are completely familiar with you as part of their hive, using a suit is a definite must to protect yourself from any defensive attacks from the drones. The suits come in a variety of color, but it is advised that you choose light and bright colors since bees are not too comfortable with dark ones. Here are the main parts of the suit:
-
- Suit
- Gloves
- Veil
Each part can be purchased separately, or you can opt to buy the entire suit as a set. Eventually, when your bees are comfortable with you, using the suit would be unnecessary.
Bee Swarm with a Queen ($100 to $200)
Once you have the hive ready, it’s time to order your bees. There are quite a lot of varieties of bees to choose from, it’s all based on your personal preference.
- Italian
- Carniolan
- Caucasian
- Russian
- Buckfast (Hybrid)
- Cordovan (Hybrid)
- Africanized (Hybrid)
Hybrid bees are basically cross-bred that were meant to be more efficient and productive. The Africanized Hybrids are the most feared since they are quite defensive and have the tendency to swarm over and kill humans lurking around their hive.
Italian bees are the most popular breed in the US. They are by far the calmest and produce the most honey due to their quick colony growth.
Building Hives vs Buying Them
As mentioned, you can save a lot more in building your own hive than buying a ready-made one. If you are skilled with woodwork and have the time to spare, you should try building your own hive. Assuming you have all the tools and equipment, you can build your very own hive at a fraction of the cost.
- Prepare Tools, Equipment, and Materials
Before starting any project, you would need to gather all the things you would need. This eliminates time wasted and maximizes your productivity.You would also need to decide on what material to use. You would want to use good quality wood that is long lasting in order to avoid rotting. Always take weather conditions into consideration. Some of the best choices are; Pine, Cypress, Cedar, Spruce, and Fir.
- Cut and Build the Boxes
Carefully measure the boards. It must be big enough to fit the number of frames you want. Cut them accordingly and fit them together. Once satisfied, secure the sides with a nail or waterproof wood glue.
- Create Notches on the Tops of the Boxes
These notches are for the frames to hold onto. Measure around ⅜ inches from the inside of the edge and mark it. You can use a small rotary saw to cut these grooves.
- Cut and Build the Base
Create the outside framing of the base, and use this frame to estimate the size of plywood you need to cut. You can add ⅛ inch holes onto the base to allow mites through, but prevent bees from escaping.
- Cut and Assemble the Frames
If you are a hundred percent invested in building the hive on your own, you would need a lot of patience making the frames. These pieces are quite intricate and may take some time and a lot of skill to make. After creating the frame, place an aluminum wire, through the frame and attach the wax foundation. You can always opt to buy the pieces of the frame separately and simply assemble them on your own.
- Cut and Assemble the Covers
The inner cover is made similarly to the baseboard. All you need to add is a vent hole onto the center of the board. It is important not to treat or paint the inner cover of your hive.The outer cover serves as the roofing and would need to work well as an insulator, especially in colder seasons. Height and design will depend on your environment. It is suggested that higher roofing be applied for urban hives due to the higher temperature and poor ventilation.
- Sand, Prime and Paint
After fixing everything together, you are now ready to sand, prime and paint your hive to your personal preference. But be sure not to paint or add any chemicals to the inner cover, frames, queen excluder, and the inner portions of the hive body.
At the end of the day, the whole point of beekeeping is to encourage you to enjoy the hobby you have chosen. If woodwork is one of your skills, by all means, build your own hive! Buying a hive will not make you less of a beekeeper.
Which Hive is Best For You?
There are actually dozens of designs in the whole world. In fact, hives are designed differently depending on the country’s climate. In the US, there are five designs that are quite popular among the people within the beekeeping community.
- Langstroth Hive
This hive is the most popular and most widely used variant all over the globe. It was invented in 1852 by Reverend Lorenzo Langstroth. The biggest advantage to this hive’s design is that it has frames for the bees to build their honeycombs into. The spacing within the hive is exactly the right amount of bee space, which will allow the bees to move freely and avoid fusing the space with propolis. It is also easier for us to inspect and harvest honey. The capacity of this hive is not limited, thanks to its smart design.
- Top Bar Hive
More common in developing countries, this hive is used by simple backyard keepers. The top bar is where the bees build their combs, and unlike the frame of the Longstroth, these bars do not give the bees a foundation as a pattern for their cell size. This hive is a more natural design for the bees. They build their honeycombs in this hive similar to how they have it in the wild. The space is limited to a small colony since there is no way of adding more levels to this hive.
- Warre Hive
Developed by Abbe Emile Ware in the 20th century, this hive is quite easy to build and assemble that the goal was to allow everyone to be able to easily manage a hive. Eventually, the name was changed to People’s hive. It uses a top bar type of framing and is intended to mimic how they build their hives in the wild. The capacity may be quite small, but it is definitely a good option if you are in this hobby to save the bee population.
- Flow Hive
The whole concept of the flow hive is centralized on human convenience. The surplus honey basically flows from the hive without you having to smoke the bees or disturbing their routine. The hive was developed in Australia recently by the Father-Son duo, Stuart and Cedar Anderson. The flow frames are specially engineered to collect the honey surplus allowing you as the keeper to collect the honey directly from the hive. It has definitely made a difference in how honey is harvested. The frames can be added freely making this hive’s capacity virtually unlimited.
- Five-Frame Nuc Hive
Better known as the “Mini Langstroth”, this hive is specifically good in nursing and raising a new queen. It is portable and is commonly used to transport a swarm from one place to another. Since it only consists of five frames, there is no space for expansion, therefore quite limited in terms of space.
How Much Honey Can You Expect From a Single Hive?

Depending on the size of your colony and the type of hive you have, you can essentially gain back the initial amount of money you have spent on the hive. A single hive is a source of dozens of marketable products such as:
- Honey
A single hive can make 20 to 60 pounds of honey during every harvest. This all depends on a variety of factors such as colony size, hive type, location, weather, and availability of local flora. At the end of the day, your bees will only be productive in conducive conditions.
- Beeswax
There are virtually dozens of things that can be done with the beeswax. It can be made into candles, soap, lip balm, and other beauty products that when processed properly can earn you big bucks.
- Bee Pollen
Said to be a superfood, these granules are quite popular among health enthusiasts. It is supposed to boost your immunity and work as an antioxidant.
Other byproducts like propolis and royal jelly are quite sought after, but due to the recent endangerment to bees, they are discouraged from being used.
Harvesting Honey
It is best to set up your hive during spring. The weather is starting to warm up, the flowers are in full bloom, and your bees are all excited to be productive before the cold season starts to set. The best time to harvest your honey would be during the fall where they would have enough honey stored for their use, and a surplus good for you. Here’s how you can harvest the honey in four easy steps:
- Pull Out The Frames
When choosing your frames, you must be sure to get the frames that do not contain your brood and queen. If you are using a Langstroth hive, it would definitely be much easier especially with the help of a queen excluder.
- Uncap the Honey
The honey is capped in the combs with wax. The bees goal was to store them for food. You can simply scrape off the wax with an uncapping fork, roller uncapper, or simply a knife.
- Place the Frame in an Extractor
By the time you have uncapped the frames, you are now ready to extract the honey with a honey extractor. Just place the frames in the basket and spin. It is quite time consuming and exhausting to do, but you do have an option of getting an electric extractor over a crank-and-axle type.
- Transfer to a Bottle
Once you have collected the honey from the extractor, you are now ready to bottle them all up for storage.
Conclusion
Taking care of bees is definitely not a walk in the park. If you are truly set on beekeeping, following this urban beekeeping guideline would definitely make a difference. Take your time to read this again and understand the basic considerations if you really want to move forward with this past time.